Not much new here for a while. The AT is getting a good workout and has about 2100 miles on it now. I've been on some work trips of late and not riding as much as I want to be, and I've also been focused on getting my wife's 1972 Honda CL350 up and running. We rebuilt the carbs together and then I had my first go at changing a clutch which was way easier than I thought it would be.
I'll probably do another oil change at the end of the season and decide on some new tires. A friend just got a 2012 R1200GS so were already planning some trips for next spring.
Tuesday, September 6, 2016
Friday, June 3, 2016
Oil Change and new Maint/Parts log.
I've started a spreadsheet to log my maintenance checks/changes and my parts additions. Right now it's a bit lean (one oil change), but none the less yours to view if you want.
2016 CRF1000 Maint/Parts log.
The oil change.
I used the owners manual which gives a brief overview of how to check and change the oil. It says to remove the skid plate but doesn't show how. Its easy to figure out but again, just an overview. I'll give a write up and take some pics later to use for reference.
1.Tools.
5mm Allen head socket or wrench
12mm socket
Short extension
Socket wrench
Oil pan
Funnel
Oil. 4.4qt DCT, 4.3qt Manual (I use Honda GN4 10W-30 Sj)
Oil filter (15410-MFJD01)
(2) Sealing washer for 12mm drain bolts.
2. Skid plate removal.
Using the 5mm Allen (or under seat Allen) remove the two bolts at the front of the plate facing the front wheel. The plate will pivot a little and you can now see that there is one rear bolt near the left foot peg and a peg on the frame facing inward which the right rear of the plate slides on to. Remove the foot peg side bolt and slide the plate off the peg.


3. Drain oil.
Remove two 12mm bolts from the crank case. Order of removal does not matter. You will need a bigger oil pan to catch both streams at once so if using a smaller pan only drain one at a time. If you do not have a center stand I suggest holding the bike in a straight up position to drain the most amount of oil out of the case. Once oil is drained from the case replace the sealing washers on the bolts and tighten the 12mm bolts (22 lbs/ft) and move the oil pan under the filter. Remove the filter and let the oil drain, holding the bike straight up again for a little bit.


4. Replace filter.
Lubricate the oil filter gasket by using some fresh oil on the tip of your finger. Honda suggests torquing to 19 lbs/ft but I'm assuming most won't have the special cap tool for the filter so spin on the filter and tighten until it is very snug.

5. Fill with oil.
Remove the oil fill plug and fit funnel into fill hole. For the DCT you will fill 4.4qt and for the Manual you will fill 4.3qt. The qt size bottle of the Honda oil has delineations of 100mL. 1 qt is 946 mL so you can roughly use the mL numbers to get a closer idea of what .4 and .3 of a qt is. 0.4 qt will be roughly 375mL and 0.3 qt will be roughly 285mL, round those off as you see fit. Once you've added the correct amount of oil replace the fill plug.

6. Check the oil level.
While on the side stand star the bike and let it idle for 3-5m. Switch off the engine and wait 2-3 minutes. Move the bike into an upright position (center stand, or second person needed). Remove the dipstick and wipe it clean with a lint free rag. Insert the dipstick until it seats but don't screw it in. Check that the oil level is between the upper and lower level marks. Replace dipstick and screw it back in tightly.

Go for a ride! (or see #7 for DCT users)
Side note: This little bushing might end up on the floor and you might look for it's home for a few minutes before realizing where it goes. :)


7. Replace DCT clutch filter.
Remove the clutch filter cover noted below. This will require a 5mm Allen, or the under-seat Allen. There are two bolts to remove.


Once the bolts are removed you will see a spring seated in the filter. Pull out the spring and set aside for the new filter.

Using a pick or small flat head screw driver remove the filter. It should take very little effort to get the filter out, you don't need to wedge anything in to pry it out. Alternatively perhaps a needle nose pliers used in the spring hole and opened up might also work.


Push in the new filter. Replace the O-ring on the cover (I don't have a part number for that one, they just threw it in the box) and screw down the bolts to 9 ft/lbs.
Now go for a ride!
Tuesday, May 31, 2016
Wildcat Mountain ride.
Had a great ride with a friend this Memorial day. We headed west until a plan formed and then we decided on heading up to Wildcat Mountain in driftless area in western WI. http://driftlesswisconsin.com/
I had my first real taste of gravel road riding and started to get a feel for the bike in the corners during this section of the ride. I'm really in need of some different tires if I'm going to do anything but gravel roads in the future and I've....just lost 60m to youtube and forums looking at tires.
E-07 Dakar and the Heidenau K60 Scout are on my short list. I'll just need to get some reviews from the other AT riders before I fully commit I think. In the meantime dry fields and gravel roads will do me just fine.
The route:


First stop for grub and gas.

Typical road in the driftless area. Everything around here was just beautiful.

Our gravel riding start. We had about 45m on these roads which all interconnected. Lots of fun back here and this was just one section. Lots of these just right off the main highway.

At Wildcat Mtn, lookout point.
 A view from the edge.


I had my first real taste of gravel road riding and started to get a feel for the bike in the corners during this section of the ride. I'm really in need of some different tires if I'm going to do anything but gravel roads in the future and I've....just lost 60m to youtube and forums looking at tires.
E-07 Dakar and the Heidenau K60 Scout are on my short list. I'll just need to get some reviews from the other AT riders before I fully commit I think. In the meantime dry fields and gravel roads will do me just fine.
The route:

First stop for grub and gas.

Typical road in the driftless area. Everything around here was just beautiful.

Our gravel riding start. We had about 45m on these roads which all interconnected. Lots of fun back here and this was just one section. Lots of these just right off the main highway.

At Wildcat Mtn, lookout point.


Thursday, May 26, 2016
First ride off-road!
Had my first off road excursion albeit a mild one. A friend has some single track back in his woods, a field with some hills and mud pits and a large area of open field with overgrown grass. I tried the hills/mud trail first and with the OEM road tires is wasn't much fun. Yay for traction control on setting 1. We rode straight into this one so I didn't think about turning anything off or turning on gravel setting. The back end was sliding like crazy. After that we went to the open field and I think this will be a good place for me to start off roading this bike.

Its just an overgrown field but there are old ruts and some bumps and dips.


Its just an overgrown field but there are old ruts and some bumps and dips.

Nothing too exciting by any means, but it felt good to get the boots on some dirt and get a feeling for the other half of what this bike was made for. Even at 5'8" I did pretty well with the bike in thes conditions. It never felt unruly or too much to handle. I do think I'll get the short seat for any other off road excursions as I could still use a little more foot on the ground. More to come!

Tuesday, May 24, 2016
Daily photos.

AT Daily Photos
That's the link to my AT Daily on Google Photos. I'm planning on taking at least one pic each day I ride and then posting them directly to this folder. Yeah, twitter might be another good idea, but I'd rather have one place where people can come and look at / download photos rather than scrolling through a ton of posts.
Enjoy!
Saturday, May 21, 2016
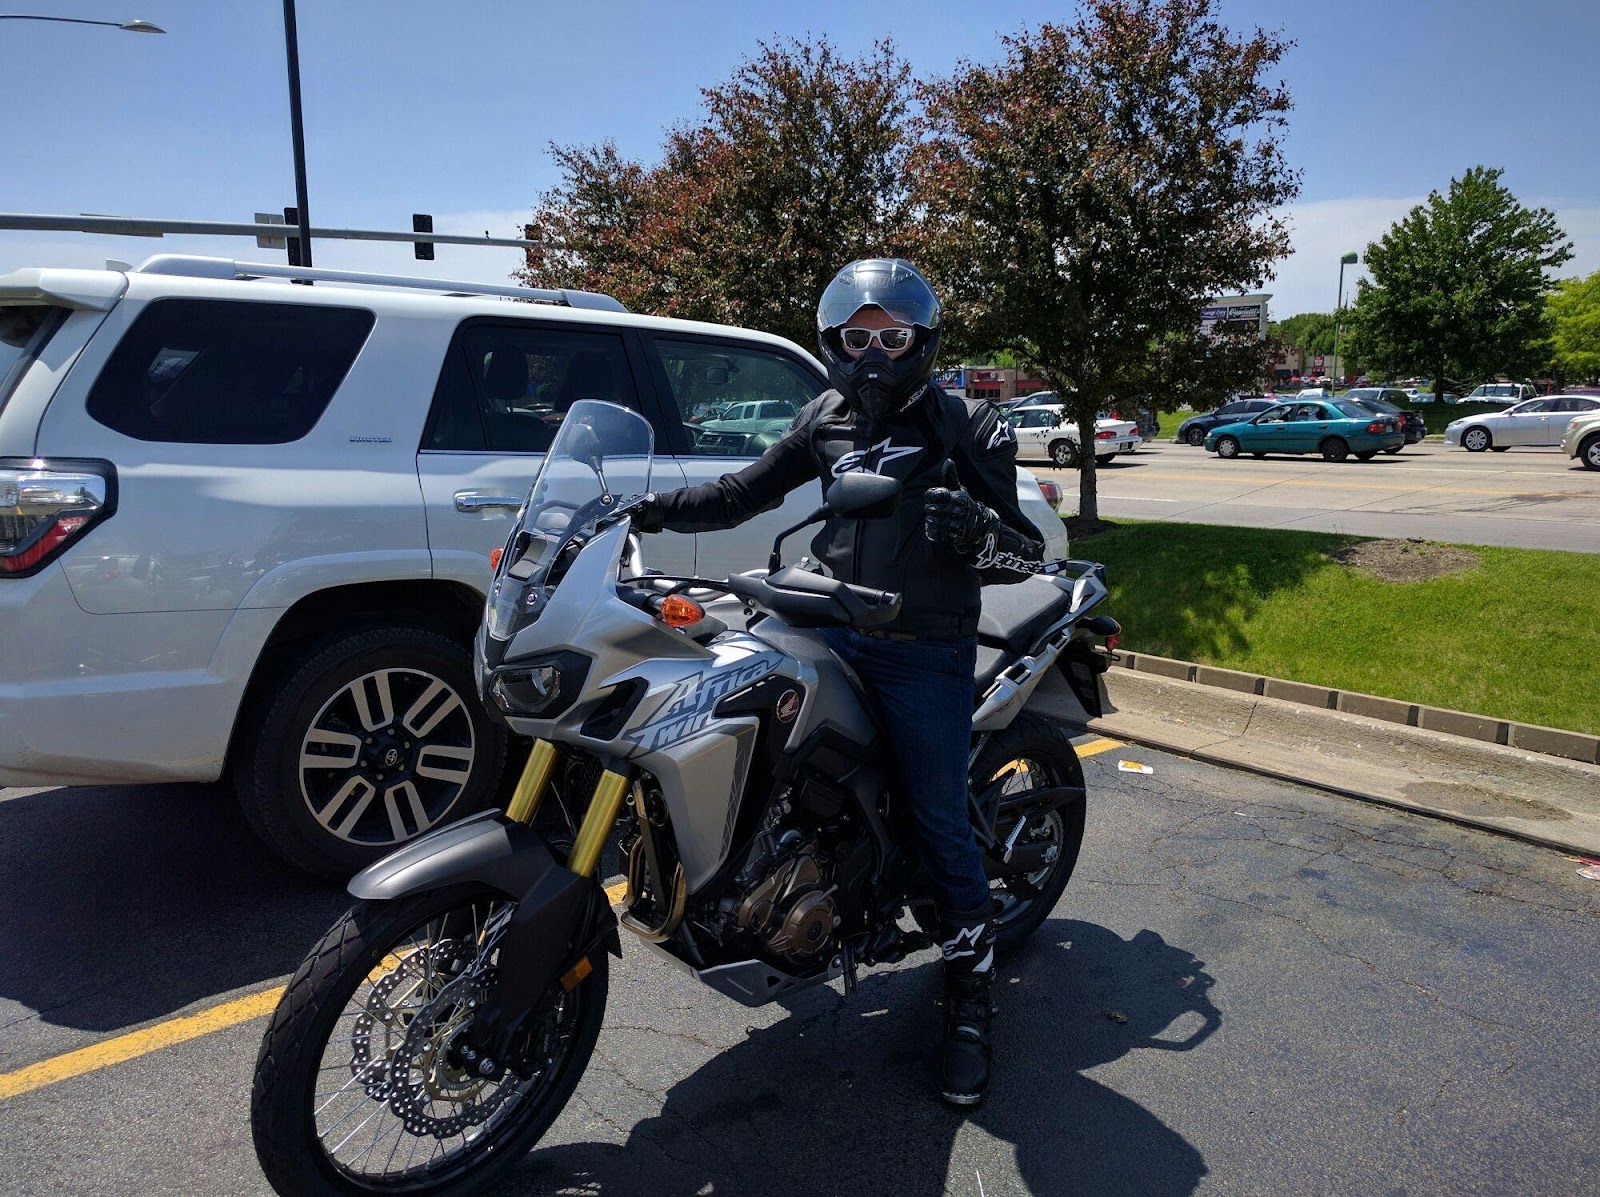
The first adventure.
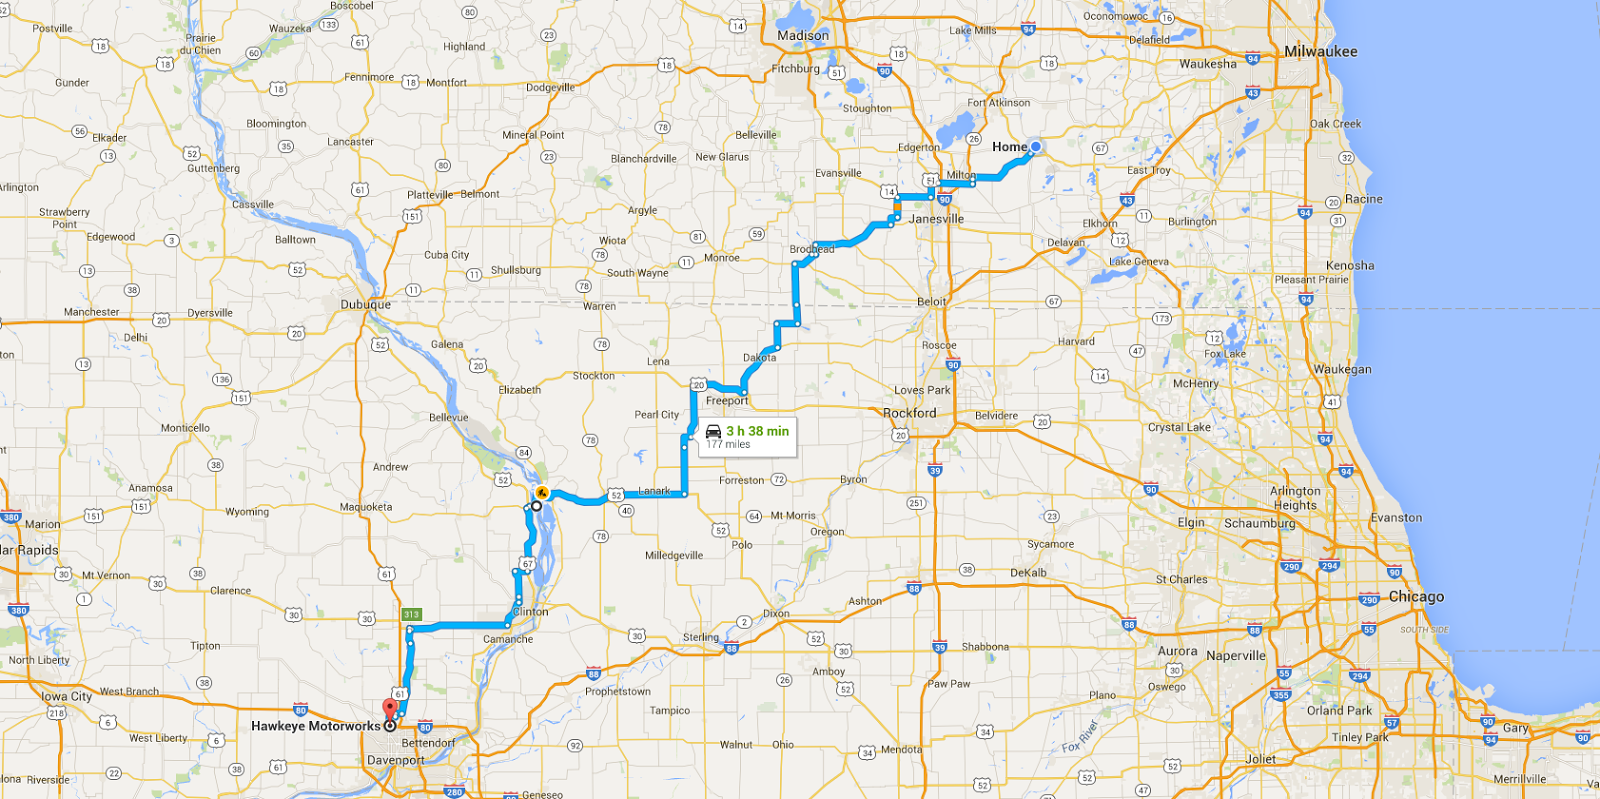
My wife and I drove 3 hours to Davenport Iowa today to pick up the AT. We took the freeways down and hit tons of construction along the way on an otherwise uneventful drive. As we got nearer I could feel the excitement rising as we got into town, got onto side streets and finally saw Hawkeye Motorworks come into view.
Dennis was the sales person I talked to and he was great. Easy going, explained everything he could (they just got the training video this morning!) and told some good stories. Also anyone with a time worn Moto GP hat is also alright in my book. Shameless plug for Hawkeye: http://hawkeyemotorworks.com/
I'm 5'8"...ish...and when we walked up to the bike my first thought was..."Oh shit...that's too much bike.". We did the paperwork and I got geared up and as we were driving out of the lot I thought.."Yup, still too much bike.". I backed it into the parking spot where we were getting lunch and I thought I'd be driving back to the dealership after lunch and getting something with 300cc less. I kept reading that with the low seat setting someone 5'8" or above could flat foot it...uh...no. Can I lean it a little and get one foot flat, sure...that you can do. My guess is 5'10" or 5'8" with legs of a model can flat foot this bike. 5'8" with a 30" inseam...not so much. I tried dialing the preload all the way down and it didn't make too much difference.

These thoughts rolled around in my head as we left our lunch spot but as I drove it and as I got comfortable with it (keep in mind I haven't ridden in about 5 years aside from the occasional blast on a friends bike) I realized that each mile I rode made the bike less intimidating. Every stop sign and every u-turn (yay construction!) made me realize how nimble this bike is and how easy it is to ride for a Liter bike. As the ride went on I gained more and more confidence and I wondered how much of my trepidation was just being back on a bike bigger than a CL350.

I put on 188 miles today and I have to say I am truly in love with this machine. It feels sublime on the road no matter the surface. I got deep into some corners and it never skipped a beat. We rode over some terribly destroyed asphalt back roads and it soaked every bump up like it wasn't there. 188 miles of back roads made for some great scenery and also lots of time to get familiar with the bike at a variety of speeds. It sat comfortably at 60, better at 70 and no problem at 80 which is all I wanted to do in the 300m break in period.
The DCT. Lets talk about the DCT. Drive, Sport 1-2-3, Gravel. Those are your options for drive modes (not counting TC or ABS settings). I was in drive most of the trip to see what I could get for mileage (49.4 btw!...on 60mph back roads with about 40-50 stop signs/lights along the way.) Drive is VERY conservative. With 1/4 throttle I would be in 6th gear before 40 sometimes and often the bike felt like it was lugging at low speeds. My suggestion around town is S2 if you are driving urban blocks, or S1 if you are in a commercial area where you have some longer distances between lights/stops. I did not try out the gravel setting yet so more on that later. You can change between drive, sport and auto/manual on the fly which is great but you can't adjust the sport level on the fly (Corrected by PTwin from Africatwinforum.com. You can adjust, there might be a speed limit though as suggested by Mike5100). Whatever you set it to while stopped is now your option on the fly. Not being the biggest guy also means I have medium-ish hands (my gloves are M) and reaching the D-S button while on throttle was a chore. What I learned was that it's just easier to use the paddle shifter on the left side to drop down a gear if needed. If you drop a gear and are in drive you will be shortly overruled back up a gear by the computer. If you are in any of the sport modes and drop a gear it will hold longer as expected by the mode you are in. If you shift up a gear in any setting it will not downshift unless warranted by letting off the throttle. Keep in mind that easy throttle inputs still equal earlier shifts no matter the mode you are in.
I did some manual shifting as well and was a little disappointed that there wasn't a sport setting for the manual shifts. They were equally as fast as a normal manual shift, but I was hoping they would be faster. Perhaps with higher rpm (I didn't break 5k or so on this trip) they will have the quicker than human response time I was expecting. I'll report back on this later.
Overall DCT was excellent. It took some time to get used to and I found myself trying to clutch in at stops more than once, but it became pretty natural over the course of the ride. I think more seat time will really allow me to dial in the settings based on my environment and know the little tricks for specific situations. All the videos and reviews sold me on it and my drive today kept me sold on it.
Some odds and ends:
There are 3 seating positions. Normal, scooted back to the passenger seat, and standing. Using a combo of these three on my 188mi, 4h ride meant my own ass was just fine when I got home. Perhaps with a more comfortable seat I could just stay in one position but moving around like that allowed me to stretch out other body parts too. Also as my first adventure bike I must say that standing while riding is fucking awesome! Why haven't owned an ADV before?
The tool kit needs an allen wrench from under the seat to open and contains a reversible screw driver and a fuse puller. It's got room for a couple metric wrenches and I think it's kinda lame that the tool kit is so bare.
The gauge cluster is easy to read and has a lot of options. Easy to navigate menus and buttons to view different stats are easy to access while riding.
In the coming entries I'll be reviewing the damper and preload settings both front and rear and I'll be getting some trail time as well. Until my next ride in the morning she's cleaned up and tucked way for the night.

Dennis was the sales person I talked to and he was great. Easy going, explained everything he could (they just got the training video this morning!) and told some good stories. Also anyone with a time worn Moto GP hat is also alright in my book. Shameless plug for Hawkeye: http://hawkeyemotorworks.com/
I'm 5'8"...ish...and when we walked up to the bike my first thought was..."Oh shit...that's too much bike.". We did the paperwork and I got geared up and as we were driving out of the lot I thought.."Yup, still too much bike.". I backed it into the parking spot where we were getting lunch and I thought I'd be driving back to the dealership after lunch and getting something with 300cc less. I kept reading that with the low seat setting someone 5'8" or above could flat foot it...uh...no. Can I lean it a little and get one foot flat, sure...that you can do. My guess is 5'10" or 5'8" with legs of a model can flat foot this bike. 5'8" with a 30" inseam...not so much. I tried dialing the preload all the way down and it didn't make too much difference.
These thoughts rolled around in my head as we left our lunch spot but as I drove it and as I got comfortable with it (keep in mind I haven't ridden in about 5 years aside from the occasional blast on a friends bike) I realized that each mile I rode made the bike less intimidating. Every stop sign and every u-turn (yay construction!) made me realize how nimble this bike is and how easy it is to ride for a Liter bike. As the ride went on I gained more and more confidence and I wondered how much of my trepidation was just being back on a bike bigger than a CL350.
I put on 188 miles today and I have to say I am truly in love with this machine. It feels sublime on the road no matter the surface. I got deep into some corners and it never skipped a beat. We rode over some terribly destroyed asphalt back roads and it soaked every bump up like it wasn't there. 188 miles of back roads made for some great scenery and also lots of time to get familiar with the bike at a variety of speeds. It sat comfortably at 60, better at 70 and no problem at 80 which is all I wanted to do in the 300m break in period.
The DCT. Lets talk about the DCT. Drive, Sport 1-2-3, Gravel. Those are your options for drive modes (not counting TC or ABS settings). I was in drive most of the trip to see what I could get for mileage (49.4 btw!...on 60mph back roads with about 40-50 stop signs/lights along the way.) Drive is VERY conservative. With 1/4 throttle I would be in 6th gear before 40 sometimes and often the bike felt like it was lugging at low speeds. My suggestion around town is S2 if you are driving urban blocks, or S1 if you are in a commercial area where you have some longer distances between lights/stops. I did not try out the gravel setting yet so more on that later. You can change between drive, sport and auto/manual on the fly which is great but you can't adjust the sport level on the fly (Corrected by PTwin from Africatwinforum.com. You can adjust, there might be a speed limit though as suggested by Mike5100). Whatever you set it to while stopped is now your option on the fly. Not being the biggest guy also means I have medium-ish hands (my gloves are M) and reaching the D-S button while on throttle was a chore. What I learned was that it's just easier to use the paddle shifter on the left side to drop down a gear if needed. If you drop a gear and are in drive you will be shortly overruled back up a gear by the computer. If you are in any of the sport modes and drop a gear it will hold longer as expected by the mode you are in. If you shift up a gear in any setting it will not downshift unless warranted by letting off the throttle. Keep in mind that easy throttle inputs still equal earlier shifts no matter the mode you are in.
I did some manual shifting as well and was a little disappointed that there wasn't a sport setting for the manual shifts. They were equally as fast as a normal manual shift, but I was hoping they would be faster. Perhaps with higher rpm (I didn't break 5k or so on this trip) they will have the quicker than human response time I was expecting. I'll report back on this later.
Overall DCT was excellent. It took some time to get used to and I found myself trying to clutch in at stops more than once, but it became pretty natural over the course of the ride. I think more seat time will really allow me to dial in the settings based on my environment and know the little tricks for specific situations. All the videos and reviews sold me on it and my drive today kept me sold on it.
Some odds and ends:
There are 3 seating positions. Normal, scooted back to the passenger seat, and standing. Using a combo of these three on my 188mi, 4h ride meant my own ass was just fine when I got home. Perhaps with a more comfortable seat I could just stay in one position but moving around like that allowed me to stretch out other body parts too. Also as my first adventure bike I must say that standing while riding is fucking awesome! Why haven't owned an ADV before?
The tool kit needs an allen wrench from under the seat to open and contains a reversible screw driver and a fuse puller. It's got room for a couple metric wrenches and I think it's kinda lame that the tool kit is so bare.
The gauge cluster is easy to read and has a lot of options. Easy to navigate menus and buttons to view different stats are easy to access while riding.
In the coming entries I'll be reviewing the damper and preload settings both front and rear and I'll be getting some trail time as well. Until my next ride in the morning she's cleaned up and tucked way for the night.
Today is the day!
Leaving now to pick up the AT!
I'll have an initial review and some pics up tonight once we get back.
In the meantime watch this AT engine assembly video!
I'll have an initial review and some pics up tonight once we get back.
In the meantime watch this AT engine assembly video!
Subscribe to:
Posts (Atom)